CoLE: Corpus of Learner English

photo of students taking an exam.

The exam by bitjungle.

So here’s the big project that’s been keeping me away from my blog for the last little while: the Corpus of Learner English (CoLE).  This is a project I have been working on for a couple of years and we are finally ready to start sharing it with the world.  Every step of the way has been an adventure: From designing the corpus, to applying for IRB approval, to compiling the data.  Here are the nitty gritty details.

I’ve always been interested in corpora — more in the idea of them than in any particular research question.  A few years ago, I initiated the American Language Program’s (ALP — Ohio State’s intensive English program) transition from paper-based placement testing to computer-based testing.  Shortly after that, I started thinking about how much easier the 30-minute placement composition components would be to analyze.  Word counts, for example, could be compared with a couple of keystrokes.  And, of course, more complex comparisons were possible such as differences in pronoun use between male and female students.  (One interesting preliminary finding there was that our male students used a lot more first person pronouns while our female students used a lot more third person pronouns.  Was this some sort of cultural artifact?  Not my research question!  But it could be yours…)

A year or two after we moved to computer-based testing in ALP, Ohio State’s ESL Composition Program also moved their testing online, in part as a response to making testing accessible to students before they arrive in the U.S.  Previously, students could not take their placement tests until they arrived.  Because test results were prerequisites for many classes, students often registered late and found many classes had already filled.  Again, I saw some data that could be an interesting corpus.

I talked with my colleague Jack Rouzer about the potential for such a corpus, and he was also very enthusiastic about the project.  We immediately began working out the details and submitted an IRB application.  This was my first experience with our IRB and it was an interesting one.  For one, I don’t think our IRB is as familiar with linguistic corpora (or even “data repositories” as the project was classified) as it is with medical testing or psychological experiments.  Once we were able to create a protocol that would reasonably protect our student participants’ privacy, we were approved.  Here’s what we came up with:

First, obviously, we ask for students’ informed consent.  We describe that we will make their writing available online in a de-identified way with only some demographic information attached.  In the corpus, we include each student’s age range, sex, country of origin, college of study, graduate or undergraduate status, and their placement level (1, 2, or out, which means they are exempt from taking ESL Composition classes.)  We ask for their consent after they have written their essays so that they know exactly what will be included. Second, we read each placement essay to be sure students don’t self-identify in any way within the content of their essays.  Third, we only include essays in the corpus for which we have at least fifty members of every demographic category.  So, for example, we will include an essay if it written by one of 500 students aged 18-21, one of 1000 female students, one of 400 Chinese students, one of 400 College of Arts & Sciences, one of 300 graduate students, and one of 200 students that placed into undergraduate level 2.  It is extremely unlikely that you would be able to identify who wrote this essay based on these demographics.  However, we would not release an essay written by one of 3 Botswanans or one of 20 students over age 25 because it is more likely that you could identify them if, for example, you know a student from Botswana.  The good news is, as we include more and more essays each year, every population will go up and we will be able to include more essays in the corpus as this threshold is reached in different demographics.

In the first semester, we were only able to include male and female, grad and undergrad Chinese students under 25 years old in Business, Arts and Sciences, and Engineering with low and intermediate placements, but subsequent additional semesters have broadened the pool to include more age bands, countries, colleges, and placement levels.

If you are interested in accessing this corpus please contact me for more information.

Leave a comment

Filed under Projects, Research, Resources

More Free Photos

free photo example: hands of people working together on a projectFrom Flickr via OSU Open Photo (License)

OSU Open Photo is a fantastic “collection of high quality, openly licensed photos from around the web” put together by Ashley Miller at Ohio State.  Images include original sources and licenses.  Most of the photos relate to higher education, technology, and people in contemporary educational or work settings.  The photos are tagged and searchable.  There are also links to other resources for finding free photos.  Although there are larger collections out there, this set is useful because it is so nicely curated.

Leave a comment

Filed under Resources

Studio Usage Heat Map

studio usage heat map - by day

If you’ve been following along, you know that I’ve been working to pull together a recording studio on a budget. Our first step was clearing out the old office that was destined to become the studio, work on minimizing the echo in the room, and painting one wall Sparkling Apple to use as a green screen. This is where our first $100 went. Next, we spent another $50 or so to light both the green screen and the talent in front of it. I’m currently working on sorting out the best solution for audio and video. (Stay tuned for updates!)

Fortunately, the lack of A/V equipment hasn’t prevented our staff from using the studio.  In fact, since the doors first opened in July, it has seen over 150 hours of use.  At this point, it is interesting to look at the patterns of usage that have emerged. Thus, the heat map, above.

To make the heat map, I added a “1” to each half-hour timeslot that the studio was reserved each week in an Excel spreadsheet. I then color-coded the data in the sheet with hotter colors reflecting higher numbers. The colors help to visualize trends in usage. For example, usage increases as the week goes on with Thursday and Friday afternoons appearing in oranges and reds. In contrast, there are times early on Monday and Tuesday that have never been reserved.

Studio usage heat map - by weekI also have a heat map that compresses all of the days into one, which I made by totaling the times for each half-hour block on the spreadsheet and then color-coding it. Click to enlarge it. Again, it’s pretty easy to see the studio warm up as the day goes on, indicating increased usage.  Having a couple of regular evening reservations also contributes to this pattern.

Color coding numbers in a spreadsheet isn’t rocket science, but it is an easy way to visualize the data to quickly get a read on the studio. And, I can see that I’m going to have to start coming in earlier on Mondays if I want to use the studio.

Leave a comment

Filed under Projects

America’s Secret Slang

If you haven’t seen it yet, America’s Secret Slang, which is produced by the History Channel, is worth checking out.  There are currently 9 episodes available, most of which are 44 minutes long.

I happened to catch this show one day when I was channel surfing and quickly got sucked in.  I haven’t seen all of the episodes, but I’ve been impressed by what I’ve seen.  Each episode takes on a general theme and then examines the origin of slang (including idioms) that relate.  Most of the segments include a person-on-the-street segment asking native speakers if they use a slang term (spoiler: they do) and if they know its origin (they usually don’t, but they often try making one up.)  The origin and explanation is then revealed through in an interesting and visual way including animated words and historical re-enactments.

I’ve linked to one episode, above, and the rest are available on the History Channel website and YouTube.  Be aware the the show is rated PG, so you may want to preview episodes before watching them in class or assigning them to your students.  Non-native speakers will appreciate being able to rewind and review the videos online.  They can also turn on captions if they find that helpful.  Overall, the shows are very well made, include a ton of information, and are interesting to native and non-native speakers alike.

2 Comments

Filed under Resources

Make a Google Form in 5 Minutes

I was once sitting in an meeting of the Gaming Special Interest Group at a CALICO Conference (I mention these details because this is a great group within a great organization — check them out) when we got to the point in the agenda where we needed to collect the names and email addresses of everyone in the group.

Rather than passing around a pen and a pad of paper, I whipped up a Google Form on my iPad and passed that around instead. Not only was it so quick and easy that I had the form created and the information collected before the end of the 30-minute meeting, but I didn’t have to try to decipher anyone’s handwriting in order to get their email address.

The simplest Google Forms look like online surveys.  As the form is completed, the answers are uploaded to a Google Spreadsheet. And, like all of the different types of Google documents in Google Drive, the form and the spreadsheet can be made public, private, or unlisted and multiple collaborators can be given various levels of access from owning to editing to viewing.  Of course, private information entered into the form is still archived by Google.  If your institution, like mine, has protocols involving what information can and can’t be stored in the cloud, you may want to investigate those before using these tools.

If you’ve never created a Google Form, take a look at the above video for a 5-minute walkthough.  Then open Google Drive, sign up for a free Google account (or sign in if you already have one) and create your form.  It’s easier than you think.

Leave a comment

Filed under Resources

“Privacy”

fingerprint copyFingerprint (not mine – combination of this image and this image)

Maybe you’ve noticed that Facebook is separating its messenger application from its mobile application. “That’s strange,” you think, “I like things the way they are. They’re integrated, which works well. Why would they change that?” Good question. According to Facebook, there are lots of reasons that your new experience will be richer and better.

But, according to this article on the Huffington Post, users who download the Messenger app agree to terms of service that are “unprecedented and, quite frankly, frightening.” For example, by installing it, you agree that the Facebook Messenger app can:

  • call phone numbers and send text messages without your intervention
  • record audio, take pictures, and take video at any time without your confirmation
  • share data about your contacts,
  • share your phone’s profile information including the phone number, device IDs, whether a call is active, and the remote number you are connected to
  • access a log of your incoming and outgoing calls, emails, and other communication

Some of these are a bit scary — recording me without my confirmation? who are you, the NSA? But maybe you’re not surprised that Facebook is collecting and sharing your information because users get the app for “free,” which basically means you pay for it by giving over your data. And anyone who agrees to those terms and conditions gets what they signed up for, right? Well what if something similar was happening on the World Wide Web? Spoiler alert: it is.

Think turning off cookies keeps websites from tracking you? Take a look at the Electronic Frontier Foundation’s Panopticlick. Even if you don’t let websites store cookies — small files that websites use to track you — on your machine, it’s likely that the combination of your operating system, browser version, browser plugins, time zone, screen size, fonts downloaded, and a few other configurations are as unique as a fingerprint. And websites recognize you by your device’s fingerprint every time you visit.

In fact, your browser history alone is another giveaway. Think about how links to sites you have visited are purple while links you haven’t are blue, then consider this thought experiment: If a website picked a handful of websites and linked to them on its webpage, it would learn about you when you visited based on your combination of blue and purple links. As the number of links grows, there would be a greater and greater chance that your specific combination would be unique. And, based on your combination of blue and purple, and the demographics of visitors to those sites, some information about you could be predicted. For example, if you have visited Martha Stewart’s website on your computer and I’ve visited Hot Rod Magazine’s website on mine, a website could predict a few ways in which we are different. And, again, the longer the list of links, the more accurate the prediction becomes.

All of this information isn’t intended to cause a panic, but rather to raise awareness. Before you bust out your tinfoil hat, consider other alternatives that are more likely to keep you safe online: Check your browser’s security settings, keep your operating system up to date, and look into antivirus and anti-malware tools. And, be aware that what you are doing online is likely trackable and traceable, so be thoughtful of where you go and what you do there. As a friend of mine recently observed in response to all of this, “It’s a scary world. But also a great one.” Be careful out there.

Leave a comment

Filed under Resources

Build a $150 Studio

IMG_4533  Our $100 studio gets $50 worth of lighting.

If you’ve been following along, you’ve already read about the $100 studio we built in an old office to record better audio and video resources for our students. We’ve recently installed $50 worth of lights to get the studio ready for video production.  Here’s what we used:

Item  #  Cost  Total
4′ two-light shop light  2 $14.98 $29.96
8 1/2″ clamp light  2 $7.85 $15.70
CFL bulbs – daylight (2 pack)  1 $9.98 $9.98
Total:  $55.64

Again, we did come a few dollars over our target of $50, but we’re in the neighborhood. Our list does not include bulbs for the shop lights (I brought in four bulbs from a twelve-pack I had in my garage) or the power strips we plugged the lights into because we scrounged those from around the office.

IMG_4536

The installation was relatively straightforward. We hung the shop lights as close to our green screen wall as possible in order to wash the wall with light evenly. An evenly lit green screen is easier to replace with another image or video in postproduction using iMovie or a similar application. We attached a paper baffle using magnets to try to keep the light from the shop lights from backlighting the subject. Green paper was not necessary, but it was readily available so we used it.

IMG_4535

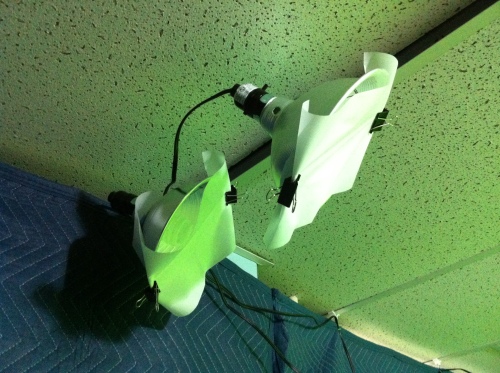
We hung the clamp lights from the ceiling at approximately a 45-degree angle from the subject. The goal is to light the subject from just above her eyes, which means these lights may be a little high, but the ceiling was an easy way to hang them and keep them out of the way. We used binder clips to attach parchment paper over the bulbs to diffuse the light, making it less harsh. In the photo, you can see that we have added a second light (for two on each side). We did this to make sure there was plenty of light on the subject. Although the CFL lightbulbs do warm up and become brighter after about five minutes, they still have to compete with all of the light reflecting off of the green screen. So, we added the second set of lights to be sure there was plenty of light, though these may not be absolutely necessary.

Each set of lights, left and right, are plugged into a power strip on the wall. None of the lights have switches, so the switch on the power strip becomes an easy way to turn them on and off without having to plug or unplug them. Finally, the last critical detail was to get “daylight” bulbs rated at 6500K. This is the best light temperature for most cameras. Fortunately, daylight bulbs were easy to acquire and not any more expensive than other temperatures (warm, cool, etc.)

So, for a few bucks at your local home improvement warehouse, you can find plenty of lights to outfit your studio on a budget. Our next step is to test a few camera / microphone combinations to see what will fit our budget and be quick and easy to use for anyone in our program who wants to make a video. Stay tuned.

1 Comment

Filed under Projects

Tips and Tricks for DIY Educational Videos

Screen Shot 2014-07-11 at 11.53.47 AMScreenshot from Wistia.com/learning

Now that we have our $100 studio put together, we have to figure out how to use it. After a little Googling, I came across Wistia.com’s Learning Center, a “hub to teach, learn, and discuss video marketing.” Don’t let the term marketing trip you up. The tips on this site are categorized into video strategy and concepting, video production, and video marketing. The first two certainly apply to creating your own educational materials and parts of the third might also be helpful.

Not surprisingly, all of the tips are presented in well-crafted, short, edutaining videos. The overarching goal is to get you up and running quickly, cheaply and easily, so a wide range of options are presented — from $600 microphones to squeezing decent videos out of a camera you may already have — an iPhone.

Some highlights for me include the Down and Dirty Lighting Kit, which explains how to setup good quality lighting for under $100; Choosing a Microphone, which advocates for a shotgun mic over a lavalier, but anything over what comes with your camera; and Shooting for the Edit, which has lots of great ideas for recording that will make your life easier in post production.

There have been a couple of videos that don’t really apply to what I want or need to do (like Get Creative with Lenses, because we’re not planning to shoot with a DSLR camera) but even those are well crafted and interesting to watch. I’d recommend all of these videos to anyone making their own videos, with or without a studio.

Leave a comment

Filed under Resources

Serious Games by Lucas Pope

Screen Shot 2014-07-07 at 10.14.26 AM (2)

Welcome to The Republia Times.  You are the new editor-in-chief.

The war with Antegria is over and the rebellion uprising has been crushed. Order is slowly returning to Republia.

The public is not loyal to the government.

It is your job to increase their loyalty by editing The Republia Times carefully. Pick only stories that highlight the good things about Republia and its government.

You have 3 days to raise the public’s loyalty to 20.

As a precaution against influence, we are keeping your wife and child in a safe location.

So begins this simple, engaging, Flash-based game by Lucas Pope called The Republia Times. The first time I played it, I was charmed by the simple graphics, which reminded me of games I used to play on my Apple IIe. When I learned that the game was created in a 48-hour game-making competition, I was impressed that there were any graphics at all.

As described in the initial instructions, above, the player begins as the editor of The Republia Times, which is pretty clearly the voice of the government’s Ministry of Media. Your task is simple enough; choose from the stories that roll through the news feed and choose how much prominence to give them in the newspaper layout at right. (See the screenshot, above.) You quickly learn from playing the game that your decisions affect the number of readers and their loyalty to the government, both of which are important to your faceless supervisors and, therefore, the well-being of you and your family.

This task is simple enough, but a more complex story of Republia soon bleeds through the game and your decisions quickly become more complicated. I won’t give away the details of the plot — the game is quick and easy (and free!) to play so try it yourself to get the full story — but just when you think you have learned to play the game, it hits you with another twist, which is a nice metaphor for life when you think about it.

The advantage that interactive media like games and simulations have over traditional media like newspapers, magazines, and television is the variety of possible user experiences. Everyone who plays The Republia Times will have a different experience. Some will quickly deduce the effect their editorial choices have whereas others won’t make the connection as easily. Different players will choose different sides and follow their own path to the end. And because the game is replayable, players can try different strategies and make different choices each time they play to test different strategies and hypotheses to explore the entirety of the game. All of this can add another layer of interest to classroom discussions.

I haven’t yet used this game with students in a classroom, but I would like to. Although government manipulation of the press could be a sensitive topic for some international students, this game is based in a clearly fictional country, which can make the topic abstract enough to make conversations more comfortable than, say, news articles about specific countries that students may have personal ties to. Additionally, the game and story are ripe for discussions like What is the author of the game is trying to communicate? Where does he stand on the issues described in the game? and What can you learn from this game, if anything?

The Republia Times is a good, quick, and free introduction to serious or art games. For a deeper dive into the genre, consider some of Lucas Pope’s other games: 6 Degrees of Sabotage (free), a game that explores the concept of six degrees of separation; The Sea Has No Claim (free), like Minesweeper but with more varied and limited resources; and Papers, Please ($9.99), a dystopian document thriller (watch the trailer here). Just because these games are serious, doesn’t mean they aren’t fun ways to begin some challenging conversations.

4 Comments

Filed under Resources

Building a $100 Studio

panorama 3a_small

Like many educators, we find ourselves producing more and more online content.  Currently, to record audio, we try to find a quiet room and record directly onto our laptops, which makes for pretty lousy audio.  For video, the process is the same, including stacking furniture and books to get the webcam in our laptops to the best possible position.  Far from ideal.  As we move to more and more audio and video production, the lack of a dedicated studio space is becoming and issue.  So, we decided build a dedicated studio.

Like most educational organizations, cost is big a factor.  We just don’t have thousands of dollars to throw at the latest 4K cameras.  We also don’t need a full-blown Hollywood studio to make materials for our students to view on the web.  We started by looking at acoustical foam as a way to insulate our space, but this quickly added up to hundreds of dollars for our 10′ x 12′ room.  Our search for other options led us to Justin Troyer, OSU’s resident media services expert and author of Medialogue, who showed us a studio on campus that he had insulated with mover’s blankets.  This looked to be a solution to some of our biggest audio issues because they would both help to block out external noise and reduce the echo within the room.

We had also been struggling with what sort of background to use for video production.  We were leaning towards a velvet or velour curtain in a neutral color because it would help to further absorb the echo within the studio.  But that fabric is expensive and it would lock us into a single background for every video, which is not ideal.  Justin suggested a green screen, which can be removed digitally and replaced with almost anything.  He has several different-sized pop-up green screens which are easy to put behind the video subjects.  But in the end we decided to got with another option he suggested: paint a wall green.  This saves both money and space because the wall does not have to be set up or stored when not in use.

So, after starting with an empty office space, we used the following items to create our studio:

Item  #  Cost  Total
Mover’s Blankets – Harbor Freight  6  $7.99  $47.94
Light-Duty Ceiling Hooks – Home Depot (4 pack)  4  $1.49  $5.96
Gallon Behr Premium Plus Ultra Interior Latex Paint – Sparkling Apple  1  $30.98  $30.98
Assorted painting sundries (roller covers, masking tape)  $15.87
Total:  $100.75

We came in just over $100, which is pretty close to our target.  Included in the costs are items that got used and disposed of while we were painting (roller covers and masking tape) but not items that I already had at home that I brought in to use (paint roller, roller tray, brushes).  I also filled in a few holes in the wall with my own putty and putty knife.  You may need to factor in additional costs if you don’t have access to these basic tools.

In the end, we incurred one final cost which was to purchase a short curtain rod and rings to which allow us to slide the mover’s blanket out from in front of the door, which makes getting in and out much, much easier.  The rod and rings cost just under $22.

Now the real fun begins.  You can see from the picture that we already have a small table, chair, microphone stand, and camera tripod.  The table will be used for straight audio recording, which is why we wrapped the end of one mover’s blanked around it to enclose it on three sides.  We still need to find a microphone or two, a video camera, and some lights.  Stay tuned as we work on acquiring these items to complete our studio.

3 Comments

Filed under Projects